Introductory
- Why would I want to use an online word processor?
- Why would I want to use this particular online word processor?
- What are the main features of Remote Writer?
- Can I see some screenshots of Remote Writer?
- What’s with the butterfly?
Operational
- How does the offline operation of this word processor work?
- How does the synchronisation of documents with the server work?
- Why do I see a box around a phrase when I style it?
- How do I print the most recent version of my document?
- How do I enter special characters that I can’t find on my keyboard?
- I’ve mucked up. How do I undo my unwanted changes?
- No, I’ve really mucked up. How do I revert to a previous version?
Technical
- What do I need in order to use this online word processor?
- Which browsers is this software compatible with?
- What is Google Gears, and what does it do?
- Where are my documents stored when I’m working offline?
- Are there any useful tools to inspect the contents of the database where my documents are stored?
- How do I install this application?
- What do the configuration file settings mean?
- How do I create authors and control their privileges?
- What are the known issues with this software?
- What is the roadmap for future releases?
- What is the licensing of this software?
- What is the model for authentication?
- What is the model for the storage of documents?
- OK, so I’ve installed Remote Writer and have allowed authors to create documents. What do I do with their content now?
- What if I want functionality that isn’t offered, such as a spell-checker?
Introductory
Why would I want to use an online word processor?
The advantages of using an online word processor include:
- Being able to use a standard web browser to create and maintain documents, without having to install specialised word processing software.
- Having your documents hosted on a remote server, so you can access them from other computers in other locations
- Having a copy of your documents available on a remote server, so that you won’t lose them if your computer crashes, or is lost or stolen
- Being able to share documents easily and work collaboratively
Why would I want to use this particular online word processor?
This particular online word processor — Remote Writer — allows you to easily create and edit documents collaboratively, whether or not you are connected to the Internet.
As to why you would want to use this online word processor in preference to others such as GoogleDocs and Zoho Writer, there are a few major reasons:
- You want to have the advantages of on online word processor, but also want to be able to work on documents when offline.
- You want to create content for a particular organisation or project, and there is a need for semantic information in the document to be indicated by using appropriate block-level and inline styles.
- You’re responsible for getting others to create documents where there is a need for semantic information in the document to be indicated by using appropriate block-level and inline styles, and you want to have control over defining these styles.
As the content produced by Remote Writer is valid XHTML, it can be programatically transformed into other formats such as XML by referring to the styles that an author has applied to their documents. - You want to have a means of creating and maintaining documents which is free, both in terms of cost and in terms of the ability to customise the software for your own purposes
You will need to be connected to the Internet initially in order to install this software, and to synchronise documents to your local machine that have already been created by others. However, once this has been done, you’ll be able to work with these documents and create new documents while offline.
What are the main features of Remote Writer?
- The ability to create XHTML content using an intuitive WYSIWYG interface
- The ability to collaborate on documents with other authors
- The ability to work on documents from different computers in different locations
- Persistence of documents both on the client and on the server
- The ability to work with documents while either online or offline
- The ability to use customised block-level and inline styles
- The ability to compare the changes between two different revisions of a given document
- The ability to revert to a previously-saved version of a document
- Administration functions to allow for creation and maintenance of author accounts
- Secure access to documents, and the ability to encrypt content during transfer between server and client
- Auto-saving of drafts of your documents as you type
- An implementation that is based on standard and freely-available web technologies.
Can I see some screenshots of Remote Writer?
Of course you may.
Screenshots of the main screens of Remote Writer are available below, and feature some dummy documents used to give an indication of features.
- The sign-in page (the first page you see when you start a session of work)
- The editor page, where documents can be created and edited
- The history page, showing all revisions of a particular document
- The comparison page, showing the differences between two revisions of a particular document
- Another view of the comparison page, showing reversion options
- The files page, showing a list of all documents, and allowing for nicely-formatted printing of documents
- The log page, showing a summary of synchronisation activity between the client and the server
- The administration page, allowing creation and maintenance of author accounts. Note that this screen is only available if you have administrator access
What’s with the butterfly?
The butterfly is Morpho Absoloni, and is used here to represent the creative act of producing beautiful content using Remote Writer (i.e. caterpillar => butterfly).
The images comes from a beautiful set of Morpho butterfly icons created by Adrian Melsha, who has this to say about them:
The Morphidae family of Butterflies are the most beautiful, sought after, and rarest of all the butterfly families, and on the trading markets, by far the most expensive. There are 80 species in the Morphidae family, and I have included 40 here, just to verify their rarity.
The Most popular of these include the Didius, Menelaus (of which there are a few different kinds), and the Rhetenor (also many variations of this butterfly).
Most butterflies of this family can be found in South America (namely Brasil and Peru), although a few species can be found in Central America and Japan in very very few numbers, as well as a few other parts of the world in which some become extinct without ever having been discovered, as so happens very often in the insect world.
Oh, and in a nice bit of serendipity, the font used the logo is Lucida, which is also the name for a type of butterfly.
Operational
How does the offline operation of this word processor work?
Initially, you’ll need to have an Internet connection to use this word processor.
This will allow the software to be installed and any existing documents on the server to be synchronised with your local machine.
A connectivity display near the top of the screen will let you know whether you are currently online or offline.
Should you not be connected to the Internet, you’ll still be able to work with the documents that you’ve already been working with, and will also be able to create new documents.
Once you reconnect to the Internet, any changes that you’ve made since you’ve last connected will be automatically synchronised with the server, and any changes that others have made (including the creation of new documents) will be synchronised to your local machine.
How does the synchronisation of documents with the server work?
When online, (presuming that your administrator has enabled synchronisation) each time the editor.htm page is refreshed your saved documents will be transferred to the server, and any documents already on the server will be transferred to your local machine.
Note that it is possible that another author will save a more recent version of a particular document that you have worked on, therefore possibly replacing your changes.
You’ll still be able to view the revision history for this document and see both sets of changes, and revert to your previous revision of the document if you so wish.
In order to ensure that all documents are synchronised with the server, a sychronisation is also performed when logging out.
Why do I see a box around a phrase when I style it using an inline style?
The box is there to help you include the phrase, and only the phrase as styled text. Using this box, it should be easy to see when extraneous leading or trailing punctuation, such as “,” or “.”, quote-marks or spaces.
If the leading or trailing punctuation is not really part of the phrase, then it should not be included in the styled text.
In the following screenshot, showing a detail of the editor screen, you’ll notice that a number of words have been marked up using the quick-links at the bottom (“Name (personal)”, “Name (work)”, and “Name (geographic)”).

How do I print the most recent version of my document?
Go to the index page, and then select the checkbox of the document(s) that you wish to print. They will appear in the righthand pane.
By clicking on the print icon or choosing “print” from your browser’s file menu, you’ll then produce a printout of the contents of the righthand pane.
Hint: you can also you “Print Preview” from your browser’s file menu to see how your document will look once it’s printed.
How do I enter special characters that I can’t find on my keyboard?
On the editor menu, there’s an omega character:
When clicked, a chart of common special characters will be presented:
Simply click on the desired character, and it will be entered at the current cursor position.
I’ve mucked up. How do I undo my unwanted changes?
If you’re currently in the editor, and you realise you’ve made some changes that you shouldn’t have, simply choose the undo arrow from the editor menu:

or enter ctrl+z (on a PC) to step backwards through your recent changes.
No, I’ve really mucked up. How do I revert to a previous version?
With the file loaded in the editor, click on the history link near the top of the editor:

This will present you with a list of revisions of the document:


Click on a “view revision” link to view a particular revision of the document. Note that revisions are list in descending order, with the latest appearing at the top of the list.
Once you’ve found the revision you want to revert to, click the “revert to this one” button near the bottom.
The chosen revision becomes the latest version of the document, but all other revisions are still maintained, and available if you want to view / revert to another revision.
Technical
What do I need in order to use this online word processor?
The requirements are really quite modest:
- A reasonably modern web broswer (see below)
- Javascript enabled (as it is by default when you install a modern web browser)
You’ll also need to allow Google Gears to be installed, which you will be prompted to do when you sign in to Remote Writer if it isn’t already installed on your computer.
You’ll be redirected to the Google Gears site, and you’ll can then download and install Gears, and then restart your web browser.
Which browsers is this software compatible with?
Remote Writer has been tested on Windows XP with Firefox version 3.0.5 and Microsoft Internet Explorer version 7.0, and Ubuntu 9.10 with Firefox 3.5.1.
Remote Writer browser compatibility really depends on the browser compatibility of TinyMCE and Google Gears.
As of writing this, Google Gears and TinyMCE both run on Firefox 1.5+ on Linux, Windows XP and Mac OS X, and Internet Explorer 6+ on Windows XP,
though check the Google Gears browser compatibility page and the TinyMCE compatibility chart for the latest news.
In order to be able to use the server-side features (i.e. authenticating and synchronising), the machine used as the server (which can, of course be the same as that used as the client) must support wxJavaScript.
As of writing this, the wxJavaScript website states that it can be installed on Windows and Linux, and a Mac version is in the works though not currently available.
If you are not able (or do not want) to install wxJavaScript, you have two options:
- Operate Remote Writer as a stand-alone client (i.e. without the benefits of collaboration)
- Write your own server-side scripts in the language of your choice. For a reasonable developer the wxJavaScript scripts should be relatively
straight-forward to implement using another scripting language (such as PHP, Perl or Ruby), providing the API exposed by the wxJavaScript scripts is adhered to.
The scripts.admin and scripts.synchronise configuration file paramters can then be easily amended to refer to these replacement scripts.
What is Google Gears, and what does it do?
Google Gears is an open source browser extension that enables web applications to provide the following offline functionality using JavaScript:
- Store and serve application resources locally
- Store data locally in a fully-searchable relational database
- Run asynchronous Javascript to improve application responsiveness
Google Gears knows which application resources (HTML pages, Javascript files etc) to store locally by referring to the manifest file.
Google Gears checks the manifest file on the server on a regular basis, ans should it detect that the version number has changed, it will rebuild the local copy of the resources.
Note that with Remote Writer, this manifest file is checked by Google Gears when signing in. Should an author remained continually signed-in,
they will not perform this check, and therefore not update their installation.
Therefore, it’s a good policy to advise authors to sign out and sign back in when a change is made to the manifest file.
A simple Perl script (manifest.pl) has been provided to rebuild the manifest file.
There’s also a tutorial involving manifest files on the Google Gears site.
Where are my files stored when I’m working offline?
Google Gears uses a SQLite database to store information when offline.
The location of this database is specific to the browser that you are using; if you use two different browsers on a single machine (say, Internet Explorer 7 and Firefox 2),
then each will have its own SQLite database, and files stored in one will not be available to the other. It is important to realise that when working offline,
in order to maintain a document consistently you need to use the same browser to edit a particular document between sessions of work.
The actual location of the database differs depending on the operating system and browser in use on the client, and are detailed on the Google Gears site.
Are there any useful tools to inspect the contents of the database where my documents are stored?
Apart from the interface provided by this online word processor, probably the easiest way to interrogate the local SQLite database is to use Christophe Coenraets’ Flex-based SQLAdmin for Google Gears, a nice browser-based tool which is also a good example of a Gears-based application.
You could also download the SQLite executable, which provides an easy-to-use command line interface.
Both these tools presume that you are comfortable with SQL.
How do I install this application?
There are four distinct parts to installing and using this application:
- Installing the application for use on the client
- Installing server-side functionality
- Customising the application for your own needs
- Final steps
Installing the application for use on the client
It’s possible to use Remote Writer without server-side functionality if desired, so that you can create and edit documents on your own computer in a web browser.
Whether simply intending to use Remote Writer for client-side activity in this fashion, or if you want to fully install Remote Writer for both client and server-side activities,
you’ll need to complete the following:
Installing the application for use on a Windows client
- Install the Apache web server. If installing Remote Writer for client-side use only, you’ll need to install it on the client machine, but normally you’ll be installing it on the server.(Note that the mod_wxjs Apache module executable used for server-side functionality will have been built against a particular version of Apache as mentioned on their website, so you’ll need to use this version of Apache if you want to avoid recompiling the mod_wxjs source later).
- Download the Remote Writer code, extract the files, and copy the extracted remoteWriter folder to the desired location on your webserver (e.g. C:\Program Files\Apache Software Foundation\Apache2.2\htdocs)
- Inside the remoteWriter folder, rename the folder sample to the desired name for your online word processor (e.g. my-word-processor).
- Inside this folder, edit the js\configuration.js file, changing the settings as desired. For Windows you need to ensure that the scripts.admin and scripts.synchronise variables are pointing to “server/admin.wxjs” and “server/synchronise.wxjs” respectively. Apart from these, you may only need to change the value of the application.title and application.header variables, but refer to the section on configuration file settings if you need more information about the configuration file.
Installing the application for use on a Linux client
- Install the Apache web server. If installing Remote Writer for client-side use only, you’ll need to install it on the client machine, but normally you’ll be installing it on the server.
- Download the Remote Writer code, extract the files, and copy the extracted remoteWriter folder to the desired location on your webserver (e.g. /var/www)
- Inside the remoteWriter folder, rename the folder sample to the desired name for your online word processor (e.g. my-word-processor).
- Inside this folder, edit the js/configuration.js file, changing the settings as desired. For Linux you need to ensure that the scripts.admin and scripts.synchronise variables are pointing to “server/admin.jsx” and “server/synchronise.jsx” respectively. Apart from these, you may only need to change the value of the application.title and application.header variables, but refer to the section on configuration file settings if you need more information about the configuration file.
If you don’t want to use Remote with server-side functionality, you’ll now need to do the following:
- Delete or rename the file ping.txt (if Remote Writer can’t find this file, it presumes that it’s working offline, and therefore won’t try to contact the server unecessarily)
- Change the js\configuration.js parameters to indicate that you’ll be working offline. This means that you need to change autoSynchFromServer and autoSynchToServer to both be false (the default value is true)
- Once this is done, simply follow the instructions listed under Final steps
If you do want to use Remote with server-side functionality, proceed with the instructions in the next section directly below.
Installing server-side functionality
Installing the server-side functionality involves setting up an appropriate server-side Javascript library to handle the required processing on the server.
The major advantage of this library is that the same Javascript used on the client can also be used on the server (for functions such as JSON processing, and md5 / blowfish encryption and decryption), thus reducing the amount of developement and maintenance overhead.
Installing server-side functionality on a Windows server
The wxJavaScript library is used to allow server-side Javascript scripts to be executed to provide administration and synchronisation functionality.
- Download the SQLite executable and install in the desired location (say, C:\sqlite). Ensure that you add the location of the SQLite executable to the path environment variable if working on Windows.
- Download the wxJavaScript library and install in the desired location (say, C:\wxjs).
Remote Writer uses the mod_wxjs Apache module — mod_wxjs is dependent on the Apache web server; if you’d like to use a different web server, the scripts.admin and scripts.synchronise configuration parameters can be used to point to different server-side scripts (though you’ll need to ensure that they implement the same API).
Depending on your requirements, you may need to compile the mod_wxjs source. - Check the wxjs modules.js file (which can be found in, say, C:\wxjs\bin) ensuring that the SQLite module is loaded by default, e.g.
  <?xml version="1.0" ?>
  <modules>
  <module name="io">../modules/wxJS_io.dll</module>
  <module name="expat">../modules/wxJS_expat.dll</module>
  <module name="db">../modules/wxJS_db.dll</module>
  <module name="tpl">../modules/wxJS_tpl.dll</module>
  <module name="sqlite" load="Y">../modules/wxJS_sqlite.dll</module>
  <module name="mysql">../modules/wxJS_mysql.dll</module>
  <module name="gui">../modules/wxJS_gui.dll</module>
  </modules>
- If necessary, compile the mod_wxjs Apache module source. The mod_wxjs Apache module executable will have been built against a particular version of Apache as mentioned on their website, so if you want to use a different version of Apache you’ll need to recompile the mod_wxjs source.
- Add the following wxjs directives to the apache conf/httpd.conf file, pointing to the installed path of the wxjs executables.
  # mod_wxjs server-side javascript stuff
  # (see: http://www.wxjavascript.net/mod_wxjs/index.html)

  LoadFile "D:/wxjs/bin/libapreq2.dll"

  LoadModule apreq_module "D:/wxjs/bin/mod_apreq2.so"

  LoadFile "D:/wxjs/bin/wxmsw28u_core_vc_custom.dll"

  LoadFile "D:/wxjs/bin/wxbase28u_net_vc_custom.dll"

  LoadFile "D:/wxjs/bin/wxmsw28u_adv_vc_custom.dll"

  LoadModule wxjs_module "D:/wxjs/bin/mod_wxjs.dll"

  AddHandler wxjs .wxjs

  wxJS_Modules "D:/wxjs/bin/modules.xml"

  wxJS_RtSize 1M

  wxJS_CtxSize 8K

  APREQ2_ReadLimit 100000K
- Run server\initialise.cmd in order to initialise the server database (either at a command-line, or simply by double-clicking on it). This will create an author administrator with a password of welcome.
Installing server-side functionality on a Linux server
Instead of wxjs, Linux RemoteWriter installations rely on the JSEXT to allow server-side Javascript scripts to be executed to provide administration and synchronisation functionality.
- Ensure that SQLite is installed.
- Download and install the debian package for JSEXT
(documentation about this library can be found on the JSEXT subsite). - Add a file entitled jsext-cgi.conf to /etc/apache2/mods-available containing the following:
 <IfModule mod_cgid.c>
  AddHandler jsx-cgi .jsx .js
  Action jsx-cgi /jsx-cgi-server
  ScriptAlias /jsx-cgi-server /usr/bin/jsext
 </IfModule>
- Add a file entitled jsext-cgi.load to /etc/apache2/mods-available containing the following:
# Depends: cgid actions
- create a link to each of these files in /etc/apache2/mods-enabled
- ensure that the permissions on the server directory are open enough so that Apache can modify the contents of store.db
- install libapache2-mod-apreq2 and add the following to your apache httpd.conf file:
APREQ2_ReadLimit 100000K
Customising the application for your own needs
You’ll possibly want to customise Remote Writer to suit your own needs. Most probably, you’ll want to customise the in-line and block-level styles,
though if you want to go further and adapt the source code for your own specific purposes, you’re most welcome to.
- Edit editor.htm, making sure that the settings for the TinyMCE editor instance are as desired (refer to the TinyMCE documentation for details).
In particular, you may want to change the settings for custom inline styles (indicated in green, below) and block-level styles (indicated in light blue, below).
If you do change the block-level styles, you must ensure that the bit after the “p.” is also found after “theme_” (e.g. if you have p.author, you must also have theme_author).tinyMCE.init({ language : "en", theme : "advanced", theme_advanced_toolbar_location : "top", theme_advanced_toolbar_align : "left", theme_advanced_buttons1 : "styleselect,formatselect,undo,redo,|" + ",cut,copy,paste,pastetext,pasteword,|,search,replace,|,bold,italic,|" + ",outdent,indent,charmap,link,unlink,cleanup,code,preview", theme_advanced_buttons2 : "", theme_advanced_buttons3 : "", mode : "exact", elements : "editor", save_callback : "customSave", content_css : "css/editor.css", extended_valid_elements : "a[href|target|name]", plugins : "preview,searchreplace", plugin_preview_width : "600", plugin_preview_height : "600", // Theme specific setting CSS classes theme_advanced_styles : "Name (personal)=namePersonal;" + "Name (organisation)=nameOrganisation;" + "Name (work)=nameWork;" + "Name (geographic)=nameGeographic;" + "Name (ship)=nameShip;" + "Tribal affiliation=affiliation;" + "Reference (autobiographical)=refAuto;" + "Reference (biographical)=refBiog;" + "Date (birth)=dateBirth;" + "Date (death)=dateDeath;" + "Date (publication)=datePublication", theme_advanced_blockformats : "p.titleWork,h1,h2,h3," + "p.genre,p.verse,p.quotation,p.citation,p", extended_valid_elements : "span[class|title]", handle_event_callback : "processKeyPress", debug : false }); // Block-level custom styles // Note: the bit after 'theme_' below must match the bit after 'p.' // in the theme_advanced_blockformats above. tinyMCE.addI18n('en',{ theme_titleWork : 'Title of work', theme_genre : 'Genre', theme_verse : 'Verse', theme_quotation : 'Quotation', theme_citation : 'Citation' }); - Define the corresponding inline and block-level styles in css/editor.css. Inline styles are associated with the <span> element, while block-level styles are associated with the <p> element. For the example above, the css definitions would be something like:
 /* Custom block-level styles. */ p.titleWork { font-size: large; line-height: 100%; font-weight: bold; } p.verse { font-size: x-small; font-style: italic; } p.genre { font-size: x-small; font-weight: bold; } p.quotation { font-size: x-small; margin-left: 2em; } p.citation { font-size: x-small; font-weight: bold; margin-left: 2em; }
 /* Custom inline styles. */ .namePersonal { font-weight: normal; padding: 2px; border: 1px solid #bbbbbb; color: #660099; } .nameOrganisation { font-weight: normal; padding: 2px; border: 1px solid #bbbbbb; color: #227700; } .nameWork { font-weight: normal; padding: 2px; border: 1px solid #bbbbbb; color: #880000; } .nameGeographic { font-weight: normal; padding: 2px; border: 1px solid #bbbbbb; color: #ff8800; } .nameShip { font-weight: normal; padding: 2px; border: 1px solid #bbbbbb; color: #dd0000; } .affiliation { font-weight: normal; padding: 2px; border: 1px solid #bbbbbb; color: blue; } span.refAuto { font-weight: bold; color: #772200 } span.refBiog { font-weight: bold; color: #006688 } span.dateBirth { font-weight: normal; color: #aa7700; } span.dateDeath { font-weight: normal; color: #aa7700; } span.datePublication { font-weight: normal; color: #aa7700; }
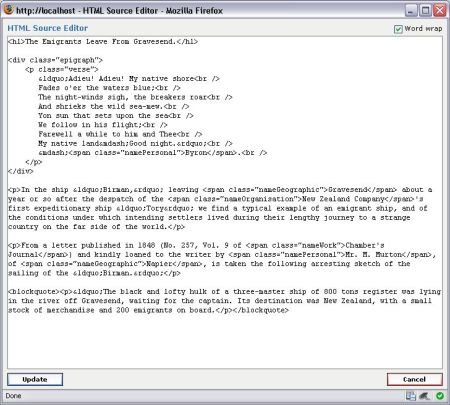
- As an example of the application of a number of the above inline and block-level styles, the screenshot below shows a document with a number of these styles applied:

- This next screenshot shows the XHTML of the document being displayed in the above screenshot (with a little bit of presentational formatting for ease of reading):

Final steps
- Fire up your webbrowser and startup the application: http://localhost/remoteWriter/my-word-processor/index.htm
- You’ll then be prompted to install Google Gears. Accept this invitation, and once Gears is installed, you’ll need to restart your browser.
- Re-navigate to http://localhost/remoteWriter/my-word-processor/index.htm, login as author administrator with a password of welcome and you’ll be underway!
- Very important: you should change the password for administrator using the administration page. Until you do this, the documents on your server are open to all comers.
What do I do if it doesn’t work after installation?
Some of the reasons people strike problems during installation, and answers where appropriate, are given below:
Q: Why, when I try to login using the default ‘administrator’ userid and ‘welcome’ password, do I get the message “invalid user” or a Javascript error?
A: Most likely you’ve forgotten to run the initialise.cmd script to initialise the server-side database.
In this case, the easiest way to get things working is:
- Run the initialise.cmd script to initialise the server-side database.
- Close your web-browser and stop the Apache web-server.
- Navigate to the location of the client-side database (as detailed on the Google Gears site), and delete it.
- Restart your web-server and web-browser, and attempt to login again, as detailed in the Final Steps section.
Q: Nope — tried that. What do I try next?
A: You can check that wxjs / jsext has been installed and is working correctly:
- Open a command window and run server\wxjs test_cmd.wxjs or server\jsext test_cmd.jsx
- If this works correctly, you’ll see the results: Here I am!
- Navigate in your browser to http://localhost/remoteWriter/my-word-processor/server/test_html.wxjs (Windows) or http://localhost/remoteWriter/my-word-processor/server/test_html.jsx (Linux)
- If this works correctly, you’ll see a list of the known users (which for a new installation should be only administrator)
- If there are still problems at this stage, check the apache logs, and the event viewer for helpful messages.
If you can’t find the answer to your question in the notes above, you could always try posting your question on the Remote Writer discussion group.
What do the configuration file settings mean?
A configuration file exists for use on the client (js\configuration.js)
Many of the configuration settings you probably won’t need to worry about, unless you are going to adapt the source for your own purposes (in which case you’ll get a good understanding of the various configuration options by examining the code).
Some of the configurations that a normal user may want to know about are:
| Parameter | Default value | Description |
|---|---|---|
| database | sample | The name of the Google Gears SQLite local database. |
| manifest | manifest.json | The name of the manifest file used by Google Gears to determine which files are needed for offline functionality. Refer to the section describing Google Gears for more details of this manifest file and the role that it plays. |
| autoEnableGears | true | Determines whether offline functionality will be enabled automatically when the user visits the home page. Offline functionality can also be controlled by those with administrator access from the administration page. |
| autoSaveDocuments | true | Determines whether Remote Writer will auto-save drafts of your documents as you type. If this value is true, then drafts will be created at intervals as specified by the autoSaveMilliSecs setting if editing activity is detected. The drafts will be commuted into a revision once a document is properly saved (either by the author clicking the Save button or by affirmatively answering the prompt to save when leaving the page). If an editing session is interrupted, say by a browser or system crash, the latest-saved draft will be presented next time the author goes to edit the file, and they will be prompted to save the draft to a revision. Note that drafts are only saved once a used has named a document. Only revisions (and not drafts) are synchronised to and from the server. |
| autoSaveMilliSecs | 60000 | Determines how often drafts are auto-saved if the autoSaveDocuments setting is true. |
| encipherContent | false | Determines whether content will be sent in plain-text or enciphered (using Blowfish encryption) during communication between the client and server. The trade-off for setting this option to true is that activities such as synchronisation will be appreciably longer. Note that, irrespective of the value of this parameter, passwords are always enciphered between the client and server (using md5 encryption). |
| cookieDaysToExpiry | 1000 | The number of days before the persistent cookie expires. This only applies if the user chooses the “Remember me on this computer” option when signing in. |
| checkOnlineFreqMilliSecs | 1000 | Determines how often the connectivity display at the top of each page will be updated. |
| application.title | Sample | The page title, as appearing in the browser title bar. Note that this should only contain ASCII characters. |
| application.header | Sample | The page heading, as appearing near the top of each page. This can contain Unicode characters. |
| pingTimeoutMilliSecs | 4000 | How long before an attempt to contact the server can be judged to have timed out. |
| pingFreqMilliSecs | 1000 | How long between attempts to contact the server. |
| pingTarget | ping.txt | The name of the pinged target file on the server, the return of which to the client indicates that the client can communicate successfully with the server. |
| scripts.admin | server/admin.wxjs | The name of the server-side script containing the administrative functions, such as authentication. This has been implemented in server-side Javascript using the wxJavaScript library, but it may be that some users prefer a different server-side technology. |
| scripts.synchronise | server/synchronise.wxjs | The name of the server-side script containing the functions controlling synchronisation of content to and from the server. This has been implemented in server-side Javascript using the wxJavaScript library, but it may be that some users prefer a different server-side technology. |
| autoSynchFromServer | true | Determines whether synchronisation of content from the server will be enabled automatically when the user visits the editor page. Synchronisation functionality can also be controlled by those with administrator access from the administration page. |
| autoSynchToServer | true | Determines whether synchronisation of content to the server will be enabled automatically when the user visits the editor page. Synchronisation functionality can also be controlled by those with administrator access from the administration page. |
| synchLatestOnly | false | Determines whether all content is synchronised or whether only the latest content is synchronised. Setting this to “true” will hopefully allow for synchronisation to be performed faster and occupy less database storage. The downside is that the revision history for each file is not complete. |
There is also a configuration file for use on the server (server\configuration.js). Some of the more useful settings are as follows.
| Parameter | Default value | Description |
|---|---|---|
| database | store.db | The name of the Google Gears SQLite server database (presumed to exist in the server directory). |
| challengeUnauthMinsToExpiry | 10 | The number of minutes to wait before expiring any unused login challenges. As obtaining a challenge from the server and providing a response both occur when an author tries to login, this value should be quite low. |
| challengeAuthDaysToExpiry | 1000 | The number of days to wait before expiring any used login challenges. Note that the author may still be logged in, and if their login challenge expires, they will need to log in again. |
How do I create authors and control their privileges?
An author with administrator access is able to create new authors, and determine whether they are active (the default value) or inactive using the functions on the administration page.
Note that, as this information lives on the server, this can only be accomplished when online.
Note also the autoSynchFromServer and the autoSynchToServer configuration parameters can be used to prevent non-administrators from easily synchronising content.
What are the known issues with this software?
There are a few known issues (and possibly a few unknown ones):
- As Remote Writer uses third-party beta software (Google Gears and wxJavaScript), it should in turn be regarded as beta software. Therefore no responsiblity will be assumed by the creator for use of this software. Users of this software undertake to use it at their own risk.
- Any data stored on the client (i.e. all files from the server once synchronisation has been completed) can only be regarded as being as secure as the client machine itself is.
Although there are a number of checks in Remote Writer to prevent authors accessing data if necessary (for example, an administrator may change a particular author’s status to inactive, preventing the author from signing-in to Remote Writer),
it is always possible for someone with access to the client machine to circumvent these checks by altering the Remote Writer client-side code or interrogate the client-side database directly.
They won’t be able to determine the passwords of any users, as they are stored using md5 encryption, however they will be able to view all content the has been synchronised to the client machine. - Describing Remote Writer as a word processor may be a little ambitious; It allows many of the more common word-processing functions that people need
when creating documents, but there are a large number of specialised features found in typical word processors that Remote Writer doesn’t support.
In many cases these features are those that the ordinary author doesn’t use too often, such as outlining, generation of tables of contents, mail-merging etc.
The word processing functionality in Remote Writer is provided by TinyMCE,
and although the TinyMCE developers have made (and are still making) a good job of implementing features,
it may be that your requirements are such that Remote Writer is simply not suitable for the content you wish to create.
What is the roadmap for future releases?
Future releases will include the following:
- Implementation of schema validation of created content.
- Allow for import from and export to popular formats such as Microsoft Word and Adobe PDF.
- Make synchronisation a background task using Google Gears’ workerpool.
Currently synchronisation happens each time the editor page is refreshed, and it is possible that the browser will be unresponsive if a large amount of content needs to be synchronised.
At the moment the Google Gears workerpool doesn’t allow for creation of XMLHttpRequest objects, but hopefully in a future version it will.
What is the licensing of this software?
Remote Writer is licensed under the GNU Lesser General Public License.
The licensing of the main components of Remote Writer is as follows:
What is the model for authentication?
In order for an author to use Remote Writer, they must have an account on the server (this can be created by an administrator using the administration page).
The first time a new author signs into a client installation (or an existing author signs into a new client installation), they must be working online so that they can be authenticated with the server. Successful authentication during this initial sign-in process
will also result in the creation of an identity for the author on the client.
During future sign-in attempts, if a connection to the server can be established, the author is authenticated against the server, and denied access if authentication fails (for example, an administrator may have inactivated the author, or reset the author’s password).
If working offline (and a connection to the server cannot therefore be established), the author is authenticated against the previously-stored details now kept on the client.
In this fashion an author will be authenticated whether signing-in while online or offline.
Should an author’s account on the server be made inactive by an administrator, it is possible that an offline author will still be able to sign-in to their local installation (using the previously-stored details kept on the client), however, when they go online again they will not be able to perform any functions on the server such as synchronisation (i.e. they only have access to documents on the client).
What is the model for the storage of documents?
The synchronisation model is based on installation, author & timestamp, and happens either automatically when refreshing the editor page or manually when an administrator synchronises using the administration page.
Each time time an author saves a document, the content is written to the local database store.
When synchronising from the server, documents on the server for any authors that aren’t known on the client, or documents for those authors that are known but where the documents bear timestamps greater than those on the client for a given installation, are copied back to the client.
In this fashion the client will gain a copy of all documents from the server.
However, all documents on the client will only be synchronised to the server if the author currently signed-in on the client is an administrator and has chosen to manually synchronise to the server using the administration page.
If the currently signed-in author is not an administrator performing a manual synchronisation, only their own documents will be synchronised to the server.
In this fashion, if each author on the client synchronises automatically (when refreshing the editor page), or if an administrator on the client manually synchronises, the client and server should both end up storing a copy of all revisions of each document.
Note also that there is no attempt to merge revisions to a document, either by the same author or by different authors.
Because of the chance of conflicts, such merging is impractical, and the preferred approach is simply to endeavour to store all revisions of each document.
In this fashion, it is then possible for an author to view the revision history, comparing any two nominated revisions, and then choose to revert to a particular revision if so desired.
OK, so I’ve installed Remote Writer and have allowed authors to create documents. What do I do with their content now?
Now that users have created content, you should have the results as XHTML content stored in your server database. For example, to find the latest revision of each file, it’s a matter of a simple SQL statement (using Christophe Coenraets’ Flex-based SQLAdmin for Google Gears, though you could easily use the SQLite command-line tool):
The content of a particular document is shown below (with a little bit of presentational formatting for ease of reading).
Note that the inline styles are represented using <span> elements (e.g. <span class=”nameGeographic”>). This content can now be transformed into other desired formats using XSLT or whatever scripting technology you’re comfortable with.
What if I want functionality that isn’t offered, such as a spell-checker?
For those willing to make some small modifications to the code in the editor.htm, tinyMCE offers a good range of functionality available via menu buttons, including a spell-checker.
Remote Writer is possible due to the efforts of those involved with a number of other projects, notably:
![]()
![]()
![]()
![]()

[…] Help notes about problems encountered during installation […]
[…] Help […]
[…] Help […]
[…] Installing server-side functionality […]